
Mini Zen Garden DIY Guide: Materials, Layout Ideas & Focal Pieces
Mini zen garden DIY guide
Build the tray yourself. Choose one clear focal piece, not a pile of random accessories.
You do not need a full mini zen garden kit to make a good tabletop garden.
You need a shallow tray, a clean base like sand or fine gravel, a few rocks, a simple rake, and one focal piece that gives the scene a reason to exist.
That last part matters. Many DIY mini zen gardens fail because they become a tray of random accessories. A better mini zen garden feels like a small landscape: open space, a few strong shapes, and one clear visual anchor.
This guide shows you how to build one from scratch, how to choose materials, what to use instead of sand, and how to make a small desk or shelf garden look intentional instead of cluttered.
Quick-Start Checklist: What You Need for a Mini Zen Garden

Start simple. A mini zen garden works best when every object has a job.
| Material | What it does | Good beginner choice |
|---|---|---|
| Shallow tray or container | Defines the garden boundary | 8–12 inch wooden tray, ceramic dish, or shallow box |
| Sand, fine gravel, or crushed stone | Creates the calm base surface | Fine white sand for raking, fine gravel for less mess |
| Rocks or stones | Create structure and visual weight | 1 larger rock + 2 smaller rocks |
| Mini rake or simple tool | Makes lines, waves, or circles | Small rake, fork, comb, chopstick rake |
| Brush or spoon | Smooths and resets the base | Soft paintbrush or small spoon |
| One focal piece | Gives the scene scale, height, path, or story | Ceramic pagoda, seated figure, mudman/sage, or bridge |
If you are building your first DIY mini zen garden, do not buy ten accessories. Buy or choose the tray first, then the base, then the rocks. Add the focal piece last.
The Mini Zen Garden Formula
Use this formula:
container + base + rocks + negative space + rake pattern + focal piece
Each part has a job.
The container controls the size of the scene. A small tray forces better choices because there is no room for clutter.
The base gives the garden its quiet surface. Sand is classic, but fine gravel, crushed stone, or clean pebbles can work better if you want less mess.
The rocks create structure. They are the mountains, islands, or anchors of the layout.
The negative space is what makes the garden feel calm. Empty sand or gravel is not wasted space. It is part of the design.
The rake pattern adds movement. Straight lines feel quiet. Curves and circles suggest water or flow around stones.
The focal piece gives the eye a place to stop. In a small zen garden, this can be a miniature ceramic pagoda, a seated figure, a small bridge, or another ceramic scene piece.
A Short Note on Zen Garden Inspiration
Mini zen gardens are inspired by Japanese dry landscape gardens, often associated with karesansui-style arrangements of rock, gravel, and open space.
For a home DIY version, you do not need to pretend you are creating an formal temple garden. The useful idea is simpler: reduce clutter, arrange a few elements carefully, and let empty space do part of the work.
That is the version this guide focuses on: a small, practical miniature landscape for a desk, shelf, coffee table, or plant display.
Step 1: Choose the Right Container

The container is the frame of your miniature landscape. Choose it before you choose decorations.
For a desk mini zen garden
Use a compact tray, around 8 x 6 inches or slightly larger. Keep the layout low and simple so it does not distract while you work.
Best setup:
- fine sand or fine gravel;
- 1–3 small rocks;
- a low ceramic focal piece or one seated figure;
- simple rake lines.
Avoid tall, crowded pieces on a busy desk. If the tray feels visually noisy, it has already failed its job.
For a shelf mini zen garden
A shelf can handle more vertical structure because people view it from the front.
Best setup:
- long narrow tray;
- sand or crushed stone;
- one miniature ceramic pagoda or bridge;
- rocks placed to one side;
- open space around the focal piece.
A pagoda works especially well here because it adds height without needing many extra objects.
For a coffee table mini zen garden
A coffee table tray can be larger and more expressive.
Best setup:
- 10–14 inch tray;
- wider raked area;
- 3 rocks of different sizes;
- one ceramic bridge, pagoda, or seated figure;
- enough empty space so the garden can be viewed from different sides.
This is the right place for a stronger focal piece, but not for a pile of unrelated miniatures.
For a plant shelf or bonsai-adjacent display
If your mini zen garden sits near a bonsai, small plant, moss tray, or rock display, treat it like a miniature landscape rather than desk decor.
Best setup:
- natural sand, gravel, or small stones;
- rocks that echo the nearby plant or bonsai display;
- one ceramic pagoda, bridge, mudman, sage, or seated figure;
- a layout that leaves breathing room around the tree or plant.
This is where ceramic scene pieces make the most sense. They help the viewer read the small space as a landscape, not just a container of materials.
Step 2: Choose the Base: Sand, Gravel, or Alternatives
Sand is the most common base for a mini zen garden, but it is not the only option.
| Base material | Look and feel | Best for | Main drawback |
|---|---|---|---|
| Fine white sand | Clean, bright, traditional | Rake patterns, desk trays, minimal layouts | Can spill or show dust |
| Natural sand | Warmer and earthier | Rustic or rock-heavy scenes | Needs rinsing/drying before use |
| Fine gravel | Textured and less messy | Shelf displays, coffee tables, homes with pets | Harder to rake fine lines |
| Crushed stone | Strong miniature landscape look | Rock gardens, pagoda scenes, bonsai-adjacent displays | Can feel heavy in tiny trays |
| Small pebbles | Durable and easy to reset | No-rake gardens, low-maintenance displays | Less “zen garden” raking feel |
| Dry moss or preserved moss accents | Soft green contrast | Plant shelf scenes, forest-like layouts | Should be used as accent, not full base |
If your goal is raking patterns, use fine sand. If your goal is a cleaner display with less mess, use fine gravel or crushed stone.
If you plan to use a ceramic pagoda, bridge, or seated figure, choose a base that supports the piece visually. White sand makes darker ceramic shapes stand out. Natural gravel makes ceramic pieces feel more like part of a miniature landscape.
Step 3: Add Rocks Before Decorations
Place the rocks before you add any figurine, pagoda, or bridge.
Rocks are the structure of the scene. They decide where the visual weight sits. If you place decorative pieces first, the tray often becomes crowded because you start filling gaps instead of building a composition.
A simple rock layout works like this:
- Place the largest rock slightly off center.
- Add one or two smaller rocks nearby.
- Leave at least one open area for raking.
- Turn the tray and check the view from the angle people will actually see.
- Only then decide whether the scene needs a focal piece.
Odd numbers often work better than even numbers because they feel less stiff. Three rocks are enough for most small trays.
Step 4: Choose One Focal Piece by Scene Job

Miniature ceramic pagoda
For height in low sand, gravel, or rock scenes.
Mudman, sage, or seated figure
For quiet human scale without more architecture.
Ceramic bridge
For movement or a path in wider trays.
This is where most DIY mini zen gardens either become strong or become cluttered.
Do not ask, “What can I add?”
Ask, “What job does the scene still need?”
Miniature ceramic pagoda: height and focal point
Choose a miniature ceramic pagoda when the tray needs vertical structure.
A pagoda works well in:
- shelf mini zen gardens;
- rock-heavy trays;
- plant shelf displays;
- bonsai-adjacent miniature landscapes;
- low sand or gravel scenes that need one taller object.
Use one pagoda, not several. Let it anchor the scene.
Mudman, sage, or seated figure: human scale and quiet narrative
Choose a mudman, sage, or seated ceramic figure when the garden feels empty but does not need more architecture.
A small seated figure gives the scene human scale. It can make a tray feel inhabited without making it busy.
This works best with:
- rocks placed like small mountains or islands;
- gravel or sand with open space;
- a quiet corner layout;
- bonsai-adjacent displays;
- miniature landscapes where the figure looks like it belongs in the scene.
Do not over-explain the figure’s meaning. In this page, the useful job is visual: scale, stillness, and a quiet point of entry.
Ceramic bridge: path and movement
Choose a ceramic bridge when the layout needs a path.
A bridge helps connect two sides of a tray. It works better in a wider container than in a tiny desk tray.
Use it with:
- gravel paths;
- small rocks on both sides;
- a wider coffee table tray;
- a scene that needs movement across the surface.
If the bridge has no visual path to cross, it will look random. Give it a reason to be there.
Ceramic house or hut: shelter and village cue
A small ceramic house can work if you want a quiet village or mountain-scene feeling.
Use it carefully. A house is visually strong, so it needs enough space around it. In a tiny tray, a house can dominate everything.
Ceramic animal: life cue
A small animal figure can add life to a nature-led tray.
Use animals as accents, not the main structure. If the animal becomes the whole story, the mini zen garden can start looking like a toy scene.
No focal piece: minimal and clean
Some mini zen gardens do not need a figurine at all.
If your tray is very small, rocks and raked sand may be enough. Minimal is better than crowded.
Step 5: Build the Mini Zen Garden
Once your materials are ready, build in this order.
1. Clean and dry the container
Dust, moisture, or residue will make the base messy. Wipe the tray before adding anything.
2. Add the sand or gravel
Pour a thin, even layer into the tray. You do not need it deep. You only need enough material to cover the base and hold simple rake marks.
3. Smooth the surface
Use a small brush, spoon, or card edge to level the base.
4. Place the rocks
Start with the largest rock. Put it off center. Add smaller stones nearby, then stop.
5. Test the focal piece
Place your ceramic pagoda, seated figure, or bridge in one spot. Step back. If it feels crowded, remove something instead of adding more.
6. Rake the pattern
Use straight lines for a quiet layout. Use circles around rocks if you want a water-ripple effect. Use gentle curves if the scene needs movement.
7. Edit the scene
This is the step most people skip.
Remove anything that does not help the tray. A good mini zen garden usually looks better after you take one object away.
Step 6: Raking Patterns That Work in Small Trays
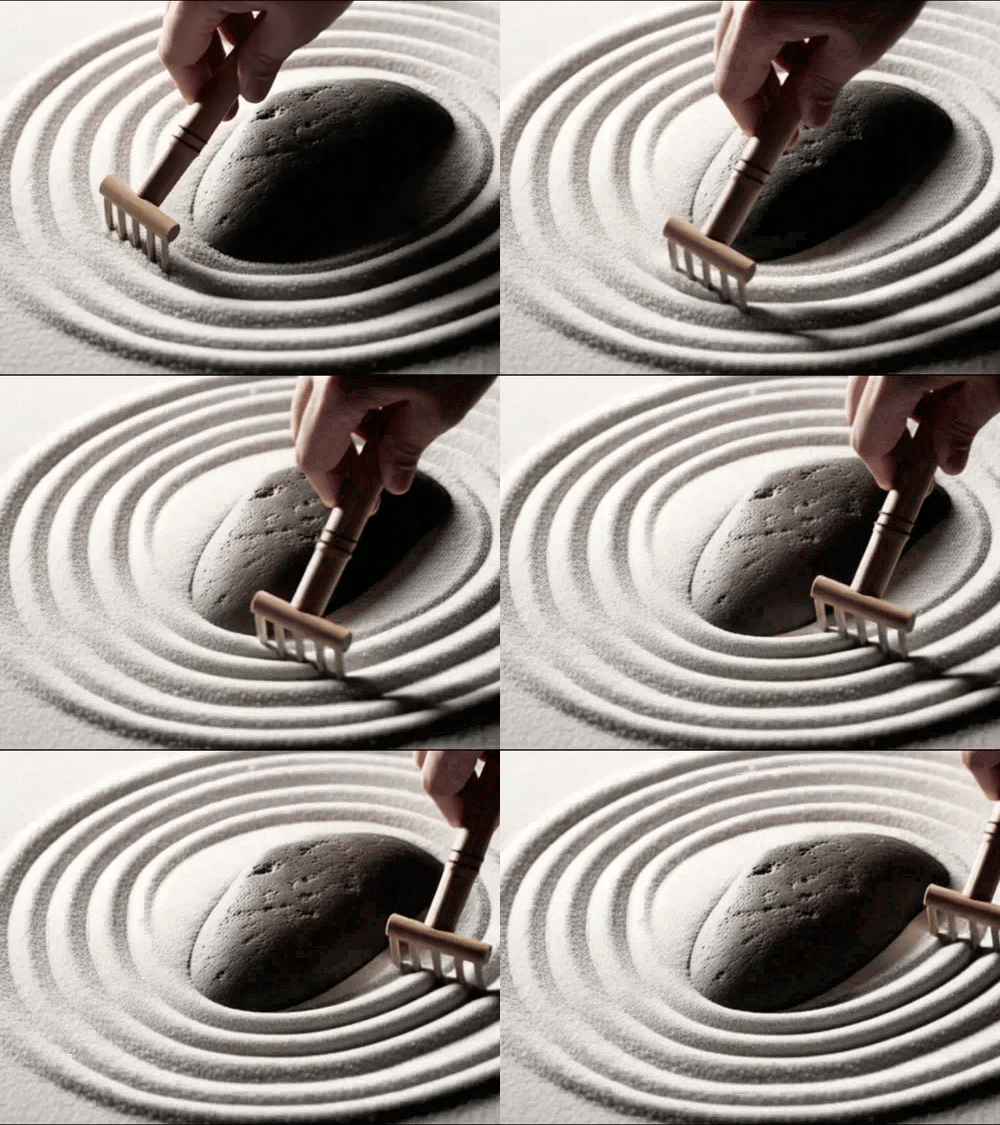
You do not need complicated patterns.
Try these first:
- Straight lines for a clean desk garden.
- Circles around a rock to make the stone feel like an island.
- Long waves for a wider tray or coffee table scene.
- A path-like line leading toward a bridge or pagoda.
- Simple reset when the surface becomes messy.
Raking is useful because it changes the scene without adding more objects. That is the point. Movement comes from the pattern, not from more accessories.
Mini Zen Garden Ideas for Small Spaces

Desk mini zen garden
Best formula:
- small tray;
- fine sand;
- 1–3 rocks;
- low seated figure or no focal piece;
- straight rake lines.
Keep it calm and low. A desk garden should not fight for attention.
Shelf mini zen garden
Best formula:
- long narrow tray;
- fine gravel or sand;
- one miniature ceramic pagoda;
- rocks placed to one side;
- open space around the focal point.
Shelf displays benefit from height. This is where a pagoda can do real work.
Coffee table mini zen garden
Best formula:
- larger tray;
- natural gravel or sand;
- 3 rocks;
- ceramic bridge or pagoda;
- wider raking pattern.
A coffee table garden can be more expressive, but it still needs restraint.
Plant shelf or bonsai-adjacent mini zen garden
Best formula:
- natural base material;
- rocks that match the nearby plant display;
- one mudman, sage, pagoda, or bridge;
- open negative space.
This is closest to The Viet Potter’s product world: miniature ceramic scene pieces used to make a small landscape feel readable.
Mini Zen Garden Without Sand: Good Alternatives
If you do not want sand, you still have good options.
Fine gravel
Fine gravel is less messy than sand and still gives a quiet surface. It works well with ceramic pagodas, bridges, and seated figures because it feels more like a miniature landscape than a craft tray.
Crushed stone
Crushed stone adds texture and weight. It is a good choice for rock-heavy scenes or bonsai-adjacent displays.
Small pebbles
Small pebbles work well if you do not care about raking. They are easy to reset and less likely to spill.
Preserved or dry moss accents
Moss should usually be an accent, not the whole base. Use it near rocks, a bridge, or a house to soften the scene.
Clean decorative sand
Colored sand can work, but use it carefully. Strong colors can make a mini zen garden look more like a craft project than a calm miniature landscape.
Natural Seasonal Mini Zen Garden Ideas

Seasonal ideas can work if they stay simple.
Spring
Use a small green accent, light gravel, or one pale flower detail. Keep the main structure simple.
Autumn
Use warmer sand or natural gravel with one darker rock. Avoid loading the tray with tiny leaves, pumpkins, or craft-store pieces.
Winter
Use white sand or pale gravel with darker rocks. A small pagoda can work well here because the contrast is clear.
The rule is the same in every season: change one or two details, not the whole identity of the garden.
Common Mistakes That Make a Mini Zen Garden Look Messy
Mistake 1: Adding too many accessories
A mini zen garden is small. Every added object makes the scene louder.
Use fewer pieces and make each one matter.
Mistake 2: Choosing a focal piece before choosing the tray
A beautiful pagoda or figure can still be wrong if the tray is too small.
Choose the container first. Then choose a focal piece that fits.
Mistake 3: Placing everything in the center
A centered layout often looks stiff. Try placing the main rock or ceramic piece slightly off center.
Mistake 4: Using rocks that are all the same size
Same-size rocks look flat. Use one larger rock and one or two smaller stones.
Mistake 5: Forgetting negative space
Empty sand or gravel is part of the design. Do not fill every corner.
Mistake 6: Mixing too many themes
A pagoda, a bridge, a Buddha-style figure, a mushroom, a pumpkin, and colored sand in one tray will not feel calm. It will feel confused.
Choose one scene direction.
Mistake 7: Buying a kit and then overcrowding it
A mini zen garden kit can be a useful starting point. But if you add too many extra objects, the tray loses its quiet structure.
If you build your own, you have more control. Choose the tray, choose the base, then choose one ceramic focal piece that actually helps the layout.
Where The Viet Potter Ceramic Miniatures Fit
The Viet Potter does not sell full mini zen garden kits with trays, sand, and rakes.
We make handmade ceramic miniature scene pieces from Bat Trang Pottery Village, Vietnam. For mini zen gardens, the strongest use is as a focal piece: the object that gives the tray height, scale, path, or quiet human presence.
Use a miniature ceramic pagoda when the garden needs height or a temple-like focal point.
Use a mudman, sage, or seated figure when the scene needs human scale and stillness.
Use a ceramic bridge when the tray needs movement or a path across the layout.
Build the tray yourself. Choose the focal piece carefully.
Build the tray yourself. Choose the focal piece carefully.
Use handmade ceramic pagodas, seated figures, mudmen, and bridges as scene anchors inside your mini zen garden or bonsai-adjacent display.
Final Rule: Make the Scene Read Clearly
A mini zen garden does not need to be expensive. It does not need to come from a kit. It does not need many accessories.
It needs a clear small-scene logic.
Choose the container. Add the base. Place the rocks. Leave open space. Rake a simple pattern. Then add one focal piece only if it makes the scene easier to read.
That is how a tray of sand becomes a miniature landscape.
FAQ
How do you make a mini zen garden at home?
Choose a shallow tray, add fine sand or gravel, place 1–3 rocks, rake a simple pattern, and add one focal piece such as a small ceramic pagoda, seated figure, or bridge if the scene needs it.
What do you need for a DIY mini zen garden?
You need a shallow container, sand or fine gravel, rocks, a small rake or simple tool, and optionally one focal piece. You do not need a full kit to start.
Can I make a mini zen garden without a kit?
Yes. A kit is convenient, but you can build your own mini zen garden with a tray, clean base material, rocks, and a simple DIY rake. The advantage of building your own is that you can choose a better focal piece and avoid random accessories.
What can I use instead of sand in a mini zen garden?
You can use fine gravel, crushed stone, small pebbles, clean decorative sand, or dry moss accents. Fine gravel is one of the best sand alternatives if you want less mess.
What size container works best for a mini zen garden?
For a desk, an 8 x 6 inch tray works well. For a shelf or coffee table, use a longer or wider tray so rocks and focal pieces have enough breathing room.
What decorations should I put in a mini zen garden?
Use decorations by job, not by quantity. A pagoda adds height, a seated figure adds human scale, a bridge creates movement, and a small house creates a shelter or village cue.
How many rocks should a mini zen garden have?
Three rocks are enough for most small trays. Use one larger rock and one or two smaller rocks. Odd numbers often feel more natural than even numbers.
Can I use ceramic figurines in a mini zen garden?
Yes. Ceramic figurines can work well as focal pieces in mini zen gardens, especially when they add scale, height, path, or quiet narrative. Avoid overcrowding the tray with too many figures.
What is the best focal piece for a tabletop zen garden?
For a narrow shelf or low sand garden, a miniature ceramic pagoda works well. For a quieter landscape scene, use a seated figure or mudman. For a wider tray, a small ceramic bridge can create a path through the scene.
How do I stop a mini zen garden from looking cluttered?
Use fewer objects. Start with rocks and open space, then add only one focal piece if the scene needs it. If the tray looks busy, remove an accessory before adding anything new.